![]() The BICS software is specifically built for electronically entering and reporting ship voyages. This manual explains step-by-step how to report your voyage and cargo data to the waterway manager using BICS.
The BICS software is specifically built for electronically entering and reporting ship voyages. This manual explains step-by-step how to report your voyage and cargo data to the waterway manager using BICS.
1. Starting and Logging into BICS
Open BICS by clicking on the BICS2 shortcut on your desktop. If you do not have a shortcut, you can also open BICS by navigating to "http://localhost" in your browser.
After opening BICS, the login screen will appear. By default, you can log in with the username "bics2" and the password "bics2", unless you have customized these settings in your BICS.
2. Entering Voyage Data
To create a new voyage, click "+ New Voyage" on the main screen. This will open a screen where you can create a ship voyage. Below, all input fields are described. Fields marked with a * are mandatory for each voyage.
Note: The responsibility for providing accurate data lies with the captain.
2.1 Voyage
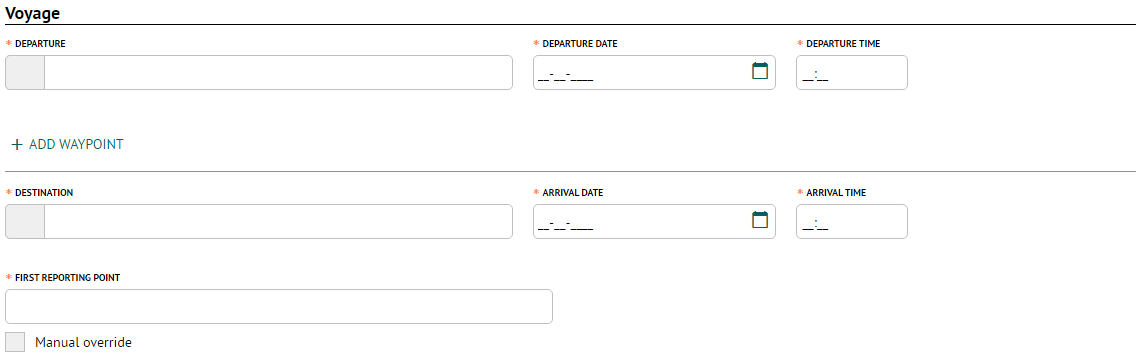
- Departure*: Enter the departure location of the voyage here.
- Departure Date*: Enter the departure date of the voyage here. This is automatically filled with the current date.
- Departure Time*: Enter the departure time of the voyage here. This is automatically filled with the current time.
- + Add Waypoint: Click "+ Add Waypoint" to add a waypoint to the voyage and fill in the requested information. This is applicable, for example, in Flanders for navigation permits. Click "+ Add Waypoint" again to add another waypoint.
- Destination*: Enter the destination location of the voyage here.
- Arrival Date*: Enter the arrival date of the voyage here.
- Arrival Time*: Enter the arrival time of the voyage here.
- First Reporting Point*: Select the first point where the voyage needs to be reported. This field may be automatically filled based on the departure location.
- Manual Override: If a first reporting point is automatically filled, this option can be used to manually override the reporting point. Use this option at your own risk.
If you frequently travel the same route, you can also copy a previously created voyage from the main screen.
2.2 Crew/Passengers

- Persons (total)*: Enter the total number of persons, including passengers, on board the navigational unit here.
- Of which passengers: Enter here how many of the total number of persons are passengers.
2.3 Administrative Details

- Invoice Address: Select an address from your BICS address book for potential invoicing.
- Transport Document / Authorisation Document: Enter a transport or authorisation document number if applicable.
- Special Transport: Check this option if the voyage involves special transport. In that case, also enter a transport document number.
2.4 Sailing Unit

- Hull*: Select the vessel associated with the voyage here.
- + New Hull: Click this button to create a new vessel in BICS.
- Current Draught*: Enter the current draught in meters here.
- Length*: Enter the current length in meters here. This is pre-filled for you.
- Width*: Enter the current width in meters here. This is pre-filled for you.
- Height*: Enter the current height in meters here. This is pre-filled for you.
- Delete: Click this button to remove a previously selected vessel from the voyage.
- + Add Hull: Click here to add another vessel to the sailing unit (for example, when sailing with an additional barge).
If you add more than one vessel to the voyage, BICS automatically creates a convoy. In that case, the following data is also requested:

- Naming Vessel: Select the naming vessel of the convoy here. The naming vessel is generally the vessel that drives the convoy.
- Convoy Type: Select the correct convoy type here.
- Suggest Convoy Type: Click this button to let BICS determine the convoy type for you.
- Current Draught: Enter the current draught of the convoy in meters here.
- Length: Enter the current length of the convoy in meters here. This is pre-filled for you after you have chosen a convoy type. The operational dimensions can be overridden with the current dimensions (for example, when it is a pontoon with protruding cargo or crane).
- Width: Enter the current width of the convoy in meters here. This is pre-filled for you after you have chosen a convoy type. The operational dimensions can be overridden with the current dimensions (for example, when it is a pontoon with protruding cargo or crane).
- Height: Enter the current height of the convoy in meters here. This is pre-filled for you after you have chosen a convoy type. The operational dimensions can be overridden with the current dimensions (for example, when it is a pontoon with protruding cargo or crane).
- Orientation: Select here whether the orientation of the convoy is wide or long.
Note: This choice automatically influences the specified length and width dimensions of the convoy.
2.5 Cargo
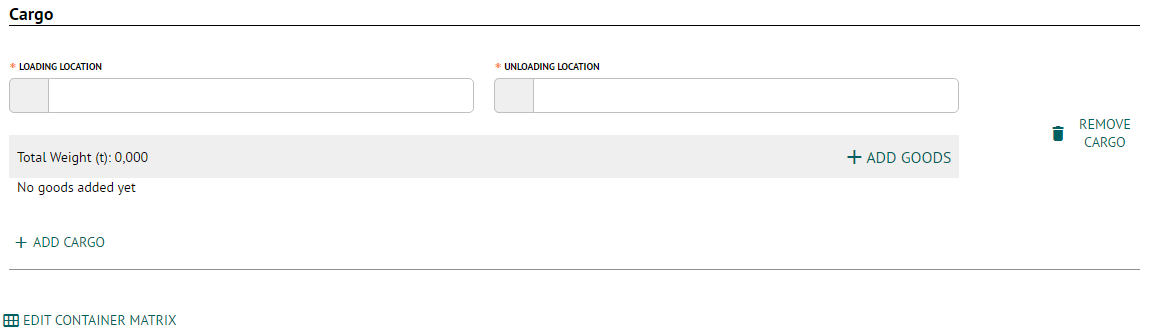
- + Add Cargo: Click this button to add cargo to the voyage.
- Loading Location: Select the loading place here. This is automatically filled with the specified departure location.
- Unloading Location: Select the unloading place here. This is automatically filled with the specified destination.
- + Add Goods: Click this button to add goods to the voyage. This will open a new window where the following information is requested:
- Hull: Select the vessel where the goods are located.
- Transport Form: Select the transport form here. This field is automatically filled when a hull is selected with a default transport form.
- Dangerous Goods: Select here if the goods are hazardous materials.
- Goods: Enter the name of the goods here.
- Empty of: Check this option if the vessel is empty of certain goods.
Note: Especially for tankers, indicating "empty of" is important, as hazardous gases can remain after unloading. This information is considered when calculating the signal placement. - Exempt from Signalling: If the goods are hazardous materials, this option can be checked to prevent the goods from being included in the calculation of the signal placement, for example, due to "Limited Quantity".
- Additional Description: Enter an additional description of the goods here if necessary.
- Remove Cargo: Click this button to remove previously added cargo from the voyage.
- Edit Container Matrix: If the voyage contains containers, this button can be clicked to edit the container matrix.
If you frequently transport the same cargo, you can also copy a previously created voyage from the main screen.
2.6 Cones

- Cones*: Select the correct signal placement of the sailing unit here. This hazard indication is important when transporting hazardous materials.
- Calculate Cones: Click here to let BICS automatically calculate the signal placement for the voyage. BICS bases the calculation on the goods added to the voyage.
Note: The responsibility for the correct signal placement lies with the captain.
3. Reporting a Voyage
After entering all voyage data, you have two options:
- Save and Send: This saves the created voyage in BICS and reports it to the waterway manager. Before reporting the created voyage, you have the option to enter an additional receiving email address. A copy of the voyage report will also be sent to that email address.
- Save: This saves the created voyage only in BICS. The voyage is not reported to the waterway manager. This can be useful if you expect to modify the voyage data or if your voyage has not yet started.
Note: Report ship voyages no later than 15 minutes before departure. The message processing can take some time.
After reporting the voyage, you can view the status of this voyage on the main screen of BICS. An explanation of the different statuses can be found here.